Client configuration
Operating System Support
Currently client devices pose the largest potential problem when deploying 802.1X.
Whilst modern operating systems such as Microsoft® Windows Vista/XP®, Mac OS X® 10.4/10.5 and Linux® natively support 802.1X, older OS such as Microsoft® Windows 98/ME® do not. Additionally there are many other devices on the network which do not support 802.1X such as printers, network music player, desktop hubs/switches, and the current iPhone (Firmware 1.1.4.). Workarounds must be found if these devices are to continue functioning on the network.
All devices which support 802.1X will need to be configured. As introducing 802.1X is a major undertaking, completely changing the way in which users connect to the network, ensuring that client devices are configured correctly is a high priority task.
Ensuring all devices are correctly configured will require planning, documentation and configuration tools. IT Support staff may also need training in 802.1X to deal with related problems and configuration issues.
Supplicants
A supplicant is an application on the client device which authenticates the client with the authentication server and maintains the client side of 802.1X session. Most operating systems have 802.1X supplicants built-in by default; however the configuration and EAP methods supported vary widely between the supplicants. In addition to the default supplicants there are a number of third party supplicants which can be either purchased or downloaded freely. Manufacturers of wireless network interface cards will often include a supplicant in the software package distributed with their hardware.
The most common supplicants for Windows XP® are:
- Intel supplicant
- MD5, TLS, TTLS, PEAP, FAST, LEAP
- Cisco® Secure Services Client (formerly AEGIS Meeting House)
- MD5, TLS, TTLS, PEAP, FAST, LEAP
- Microsoft® 802.1X Authentication Client
- TLS, PEAP
- Juniper Odyssey Access Client (Formerly Funk)
- MD5, TLS, TTLS, PEAP, FAST, LEAP, SIM
- SecureW2 Client
- TTLS
OpenSEA
OpenSEA (Open Secure Edge Access) is an alliance promoting and developing XSupplicant (a.k.a. Open1X), a robust, open source 802.1X supplicant for multiple platforms. OpenSEA’s primary aim is to promote the IEEE 802.1X standard for controlling network access. Support for OpenSEA has been steadily growing and the alliance now consists of a number of large vendors working in the 802.1X networking field.
JANET(UK) is a member of the OpenSEA alliance and is currently investigating the potential of XSupplicant as a standardised supported supplicant for UK educational organisations: http://www.openseaalliance.org.
Configuring XSupplicant
XSupplicant splits the configuration into three parts:
- Trusted Servers: Users can add their trusted certificate authorities and server certificates either by importing or selecting from the list of installed certificates.
Figure 14: OpenSEA Xsupplicant - Trusted Servers

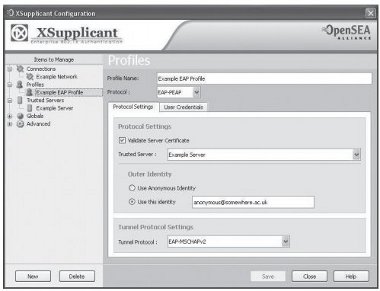
- Profiles: Users can create EAP profiles selecting EAP method, outer identity, user credentials and trusted servers.
Figure 15: OpenSEA Xsupplicant - Profiles
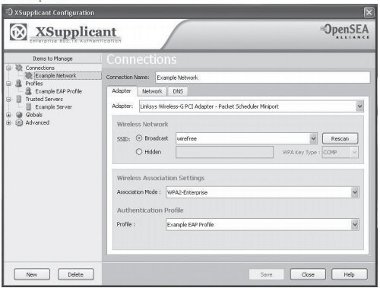
- Connections: Users can create network profiles for different interfaces and associate them with an EAP profile.
Figure 16: OpenSEA Xsupplicant - Connections
Supplicant Configuration Windows XP®
Windows XP® has an 802.1X supplicant built-in that will authenticate either the client or the machine, on both wireless and wired network interfaces. To configure the supplicant the user must go through a number of steps:
- Install certificate/certificate authority to identify the authentication server
- Configure the PEAP settings for the network interface which the user wants to be authenticated for
- Provide login credentials to authenticate the user with the authentication server.
Certificate Authority Installation
1. To install a certificate authority, double click on certificate icon.
Figure 17: Windows® Certificate Icon
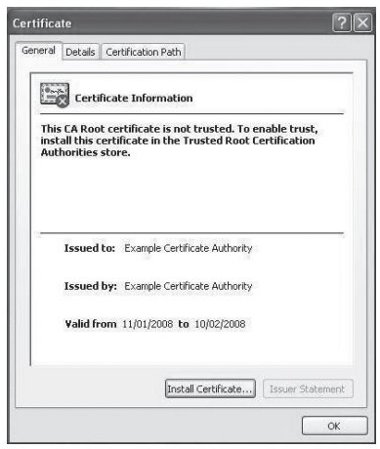
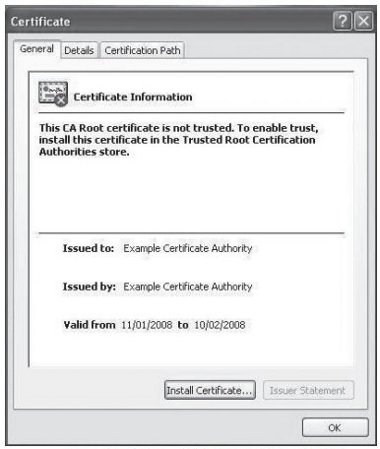
2. Click on <Install Certificate...> in the Certificate Window.
Figure 18: Windows® Certificate General Details
3. Choose to ‘Place all certificates in the following store’ then click <Browse...>.
Figure 19: Windows® Certificate Import Wizard
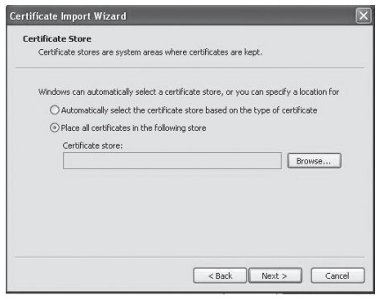
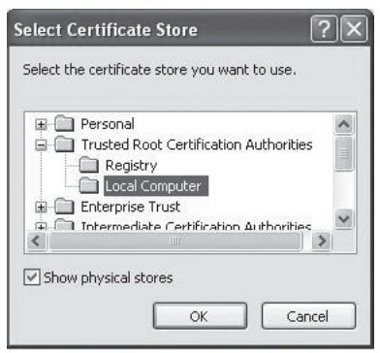
4. Select ‘show physical stores’, then choose ‘Trusted root certificate authorities’ and ‘local computer’ before clicking <OK>.
Figure 20: Windows® Certificate Store Location
Client Supplicant Configuration
After the certificate has been installed, the user can configure their client machine to user authenticate using PEAP. To do this they must:
1. Locate the network interface in the network connections control panel and right click on its icon.
2. Select ‘Properties’ from the menu.
3. For wired network interfaces skip to step 7; for wireless, carry on.
4. Select the ‘Wireless Networks’ tab, then choose the correct SSID from the list of Preferred Networks.
5. Click on the <Properties> button.
6. Choose either WPA or WPA2 for the Network Authentication.
7. Click on the ‘Authentication’ tab.
Figure 21: Local Area Connection Properties
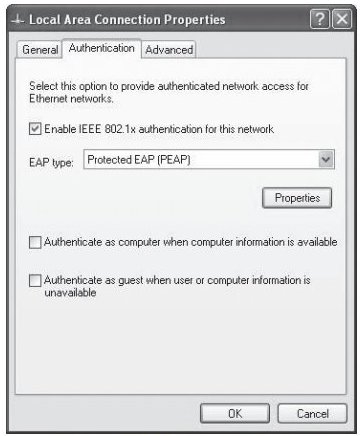
8. Ensure ‘Authenticate as computer when computer information is available’ is not selected.
9. Choose ‘Protected EAP (PEAP)’ for the EAP type, then click <Properties>.
10. Select ‘Validate server certificate’ and choose the Certificate Authority from the list.
Figure 22: Windows® Protected EAP Properties
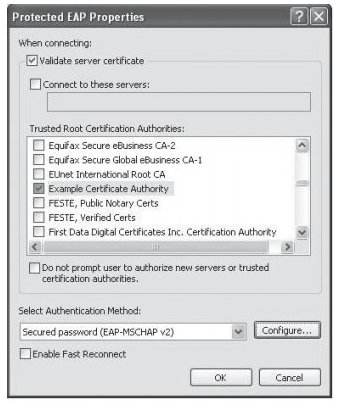
11. select ‘Secured password (EAP-MSCHAPv2) from the Authentication Method list and click <Configure>.
12. un-tick ‘Automatically use my Windows logon name and password’ before selecting <OK>
Supplicant Configuration Macintosh OS X® 10.5 (Leopard)
Macintosh OS X® has a built-in 802.1X supplicant that will authenticate either the client or the machine on both wireless and wired network interfaces. The supplicant has a number of differences introduced since 10.4. To configure the supplicant the user must go through a number of steps:
Certificate Authority Installation
1. Click on your site’s CA certificate and you should then see a prompt from the Keychain Access utility asking you if you want to add the certificate to your keychain, as shown below. Click the <OK> button to do this.
Figure 23: Add Certificates Dialogue Box

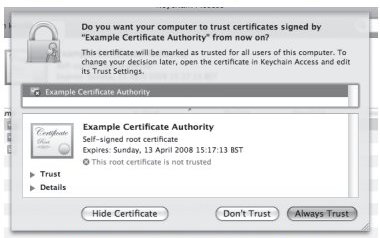
2. You will be prompted to set some basic trust settings; select Always Trust.
Figure 24: Certificate Trust Dialogue Box
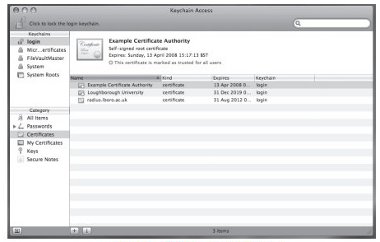
3. Double click on the Certificate Authority item, as shown highlighted in the Keychain Access window below.
Figure 25: Keychain Access Window
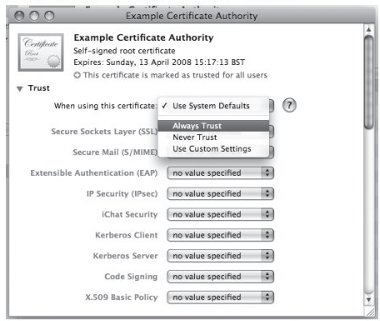
4. A new window will appear, showing detailed information about the Certificate Authority. Click on the small triangle to the left of Trust and select the value Always Trust from the ‘When using this certificate:’ drop-down menu as shown below.
Figure 26: Selecting to Always Trust a Certificate
5. Press Apple (Command) key + Q to leave Keychain Access
Configuring the Wireless Network
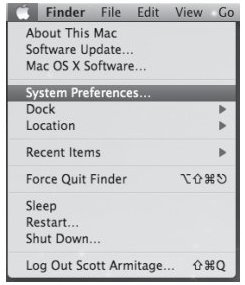
1. Open the System Preferences application.
Figure 27: Launching System Preferences
2. Once the System Preferences window has been displayed, click on the Network option.
Figure 28: Network System Preference Applet
3. The Network window will appear. Select Airport from the sidebar, and then click on the Advanced button.
Figure 29: Network System Preference Window

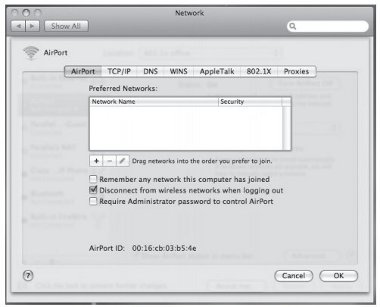
4. Once the Advanced Airport menu has been displayed, select the 802.1X tab.
Figure 30: Advanced Airport Configuration Window
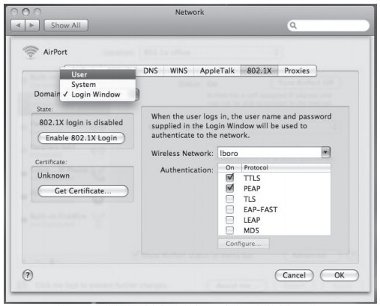
5. Change Domain option from Login Window to User.
Figure 31: 802.1X tab within Advanced Airport Configuration
6. Select the small plus sign + at the bottom of the Configuration window to add a 802.1X configuration.
Figure 32: Adding 802.1X Configuration
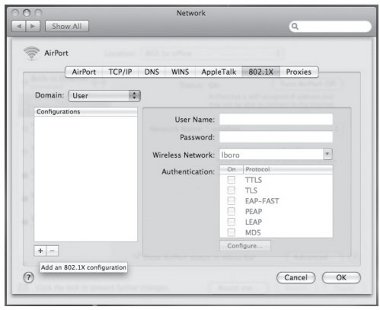
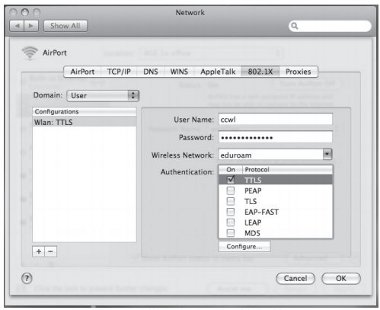
7. Under Configurations enter a name for the connection, e.g. Wlan: TTLS, and then enter your username for User Name and your password in the Password field. Select your SSID from the Wireless Network list, and ensure that only TTLS is ticked under Authentication. If your AAA system can only handle PEAP then select PEAP instead of TTLS.
Figure 33: 802.1X Configuration Credentials
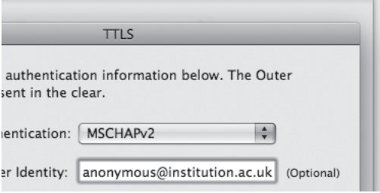
8. Click Configure below the Authentication box to display the TTLS configuration window and enter your organisational outer identity:
Figure 34: Configuring TTLS
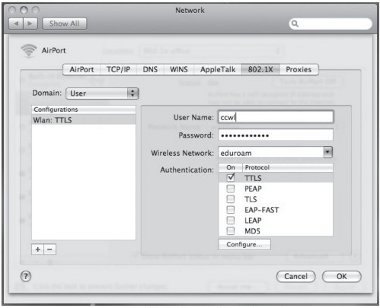
9. After being returned to the main AirPort window, select <OK>.
Figure 35: Confirming 802.1X Configuration
10. Once returned to the Network panel of System Preferences, select your SSID from the Network Name drop-down selection box and click <Apply>.
Figure 36: Selecting SSID for 802.1X Enabled Access
11. If everything has been completed correctly, the computer should now be connected to the wireless network and one should able to browse the Internet as normal.
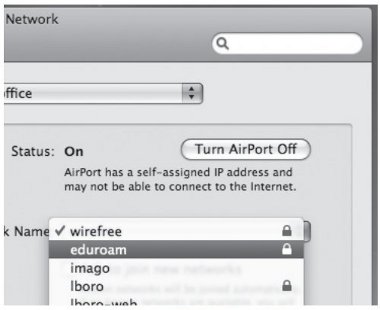
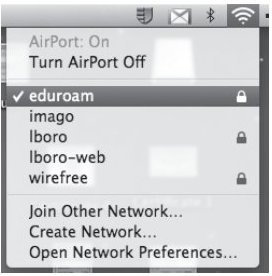
The next time a user wishes to connect to the wireless network they may need to click on the AirPort symbol in the menu bar at the top of the screen, and select the appropriate SSID from the list of available networks. This should only need to be done once, as the SSID will be added to the computer preferred networks list in the future.
Figure 37: Airport Selection Menu
Debugging 802.1X under Mac OS X®
The Macintosh platform offers a number of options to facilitate advanced debugging of 802.1X related issues. Configuration is enabled using the Terminal application.
Open a terminal window and type:
sudo mkdir /var/log/eapolclient
export NSDebugEnabled=YES
Load the Network Connection Application and attempt to connect to the 802.1X (EAP) wireless network. This will generate a log file in /var/log/eapolclient/ which is viewable with pre-installed text editors and will aid debugging of the system.


