802.1X supplicant configuration for Windows XP
802.1X Supplicant Configuration
The following instructions are for Windows XP SP2: other platforms or software may display different menus and forms but the same information will need to be entered.
- Right click on the wireless network icon in the system tray and select View available wireless networks
- Select the ‘eduroam’ SSID and click Connect (this attempted connection will fail, but it will ensure that Windows is aware that the network exists).
- Select Change advanced settings
- Select the Wireless networks tab
- Select the ‘eduroam’ SSID from preferred networks
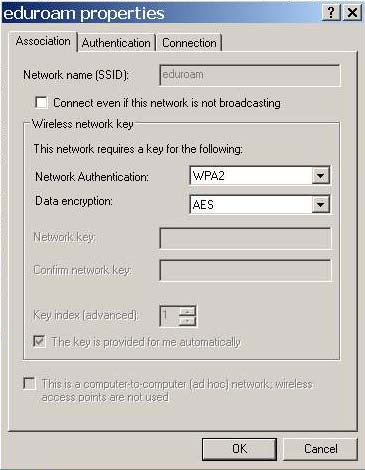
- Click on Properties, which will open an eduroam properties window with the Association tab selected.
- Set Data Encryption to WPA2.
- Set Data Encryption to AES.
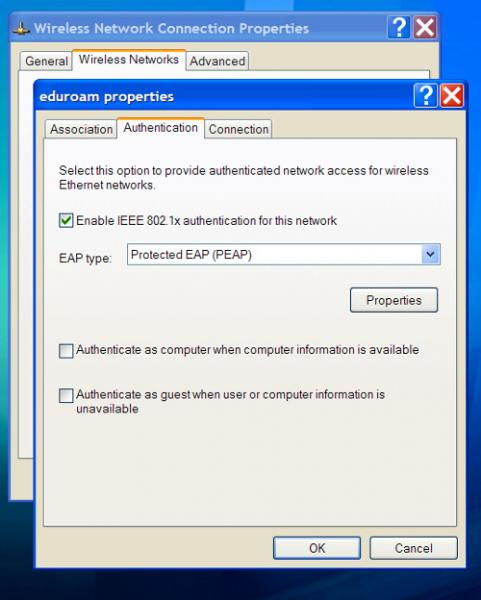
- Click on the Authentication tab

- Ensure that Enable IEEE 802.1X authentication for this network is ticked.
- Set the EAP Type to Protected EAP (PEAP). Deselect Authenticate as computer and Authenticate as guest.
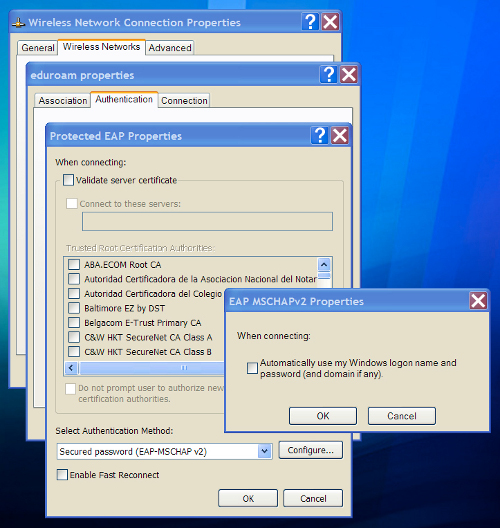
- Select EAP Properties:
- Select Authentication method as Secured Password (EAP-MSCHAP v2).
- Select Configure...
15. Ensure that Automatically use my Windows logon name and password is NOT selected. Click OK on the EAP MSCHAP v2 properties window.
- If you do not have your organisations root certificate installed, ensure that Validate server certificate is NOT ticked.
- If you do have your home organisation root certificate installed (optional):
- Ensure that Validate server certificate IS ticked.
- Choose the appropriate certificate from your Trusted root certification authorities list.
- Click OK for the PEAP Properties.
- Click OK for eduroam Properties.
- Click OK for Wireless Network Connection Properties.
- A dialogue balloon associated with the wireless network icon in the systems tray will appear, prompting the user to Select a certificate or other credentials. Click on this balloon.
- In the resultant Enter Credentials window, enter your eduroam username (including realm) and password, leaving the domain field blank.
- Click OK. Your laptop should now authenticate your credentials with your home organisation and, if successful, gain network access.


